
HTML 공부
오늘은 뜬금없지만, HTML에 대해서 정리를 해보겠습니다.
출처는 https://www.w3schools.com/html/ 입니다.
필요한 내용은 ctrl+f로 검색하시기 바랍니다. :D
<h1></h1> 태그는 머리말을 나타냅니다. 숫자가 커질수록 글자 크기가 작아집니다.
<p></p>는 절을 나타내는 태그입니다.
<a href="https://www.w3schools.com">This is a link</a>
a 태그는 하이퍼링크를 나타냅니다.
<img>태그는 이미지를 불러올 때 사용합니다.
<img src="w3schools.jpg" alt="W3Schools.com" width="104" height="142">
alt는 액박이 뜰 시, 설명문이 나오게 합니다.
<br>와 같은 내용을 담지 않는 태그는 닫지 않아도 됩니다.
태그의 경우 소문자를 사용하도록 권장합니다.
HTML Attributes(속성)의 경우 태그의 추가 정보를 나타냅니다. 그리고 항상 시작 태그에 사용되며, name="value"형태를 띠고 있습니다.
style 속성에는 색, 크기, 글자체 등을 설정할 수 있습니다.
<p style="color:red">I am a paragraph</p>
lang은 언어를 설정해줍니다.
<html lang="en-US">
title 태그는 마우스를 올렸을 때 나오는 설명을 나타냅니다.
<h2 title="I'm a header">The title attribute</h2>
<p title="I'm a tooltip">
Mouse over this paragraph, to display the title attribute as a tooltip.
</p>
어느 태그에나 위와 같이 쌍 따옴표를 써주는 것이 좋습니다.
<hr>태그는 화면에 가로줄을 긋습니다.
<head>태그는 화면에 나타나지 않고, 소스상에서 정보를 나타냅니다.
<head></head>
<br>태그는 줄바꿈을 나타냅니다. \n과 같은 역할
<pre>태그는 적은 대로 화면에 보여줍니다.
<pre></pre>
글자 스타일을 나타내는 속성입니다.
<p style="color:red;">, <p style="color:blue;">, <p style="font-size:36px;">
스타일 속성의 문법은 다음과 같습니다.
<tagname style=“property:value;”>
웹페이지 배경색을 변경하는 스타일 속성은 다음과 같습니다.
<body style="background-color:powderblue;">
글자체를 변경하는 속성입니다.
<h1 style="font-family:verdana;">This is a heading</h1>
글자 크기를 변경하는 속성입니다.
<h1 style="font-size:300%;">
글자 정렬 위치를 변경하는 속성입니다.
<h1 style="text-align:center;">
<p><b>태그는 글자 굵게입니다.<strong>
<p><b></b></p>
<p><i>태그는 이탤릭 글자입니다.<em>
<p><i></i></p>
<p><sub>태그는 첨자(다리 글자)입니다.
<p><sub></sub></p>
<p><sup>태그는 첨자(어깨 글자)입니다.
<p><sup></sup></p>
<p><small>태그는 글자를 작게 만들어 줍니다.
<p><small></small></p>
<p><mark>태그는 형광펜을 칠합니다.
<p><mark></mark></p>
<p><del>태그는 글자 지우는 마크를 나타냅니다. 가나다라
<p><del></del></p>
<p><ins>태그는 밑줄을 긋는다.
<p><ins></ins></p>
<p><q>태그는 따옴표를 나타냅니다.
<p><q></q></p>
<blockquote>태그는 인용을 나타냅니다.
<blockquote cite="http://www.worldwildlife.org/who/index.html"></blockquote>
<abbr>태그는 특정 문자에만 tilte 속성을 적용할 수 있습니다.
<p><abbr title="World Health Organization">WHO</abbr></p>
<address>태그는 주소 정보를 나타낼 때 사용합니다. 이탤릭으로 표현됩니다.
<address></address>
<cite>태그는 보통 작품의 제목을 나타낼 때 사용합니다. 이탤릭으로 표시됩니다.
<p><cite></cite></p>
<bdo>태그는 글자 방향을 정할 수 있습니다. rtl은 글자 순서 반대
<bdo dir=“rtl”></bdo>
<!-- -->태그는 주석 태그입니다.
<!-- 주석 -->
<!-- [if IE 9]> <![endif]--> 조건을 줄 수 있습니다.
색 있는 테두리를 씌울 수 있습니다.
<h1 style="border:2px solid Tomato;">Hello World</h1>
색깔을 사용할 때 여러 가지 표현법이 있습니다.
<h1 style="background-color:rgb(255, 99, 71);">rgb(255, 99, 71)</h1>
<h1 style="background-color:#ff6347;">#ff6347</h1>
<h1 style="background-color:hsl(9, 100%, 64%);">hsl(9, 100%, 64%)</h1>
<h1 style="background-color:rgba(255, 99, 71, 0.5);">rgba(255, 99, 71, 0.5)</h1>
<h1 style="background-color:hsla(9, 100%, 64%, 0.5);">hsla(9, 100%, 64%, 0.5)</h1>
<style>태그를 활용하여 외부에서 스타일을 설정할 수 있습니다.
padding(여백), margin(간격)
<style>
body {background-color: powderblue;}
h1
{
color: blue;
font-family: verdana;
font-size: 300%;
}
p
{
color: red;
border: 1px solid powderblue;
padding: 20px;
margin: 50px;
}
</style>
링크를 사용하여 외부의. css 파일을 활용할 수 있습니다.
<link rel="stylesheet" href="styles.css">
id 값을 부여하여 특정 절만 변경할 수 있습니다.
#p01
{
color: blue;
}
<p id="p01">I am different.</p>
‘#’은 id, ‘.’은 class를 사용합니다.
p.error
{
color: red;
}
<p class="error">I am different.</p>
다른 사이트의 .css를 사용할 수 있습니다.
<link rel="stylesheet" href="https://www.w3schools.com/html/styles.css">
<link rel="stylesheet" href="/html/styles.css">
같은 경로에 있다면 아래와 같이 쓸 수 있습니다.
<link rel="stylesheet" href="styles.css">
링크의 경우 text만 가능한 것이 아니라 이미지나, 다른 원소가 될 수 있습니다.
링크의 경우 같은 웹사이트 안이면 http://www가 필요 없습니다. 외부 일시 전부 필요합니다.
링크 주소의 표현 색을 행위 기반으로 변경할 수 있습니다.
a:link (방문 안 한 사이트)
{
color: green;
background-color: transparent;
text-decoration: none;
}
a:visited (방문한 사이트)
{
color: pink;
background-color: transparent;
text-decoration: none;
}
링크에는 5가지 방법이 있습니다.
_blank - Opens the linked document in a new window or tab
_self - Opens the linked document in the same window/tab as it was clicked (this is default)
_parent - Opens the linked document in the parent frame
_top - Opens the linked document in the full body of the window
framename - Opens the linked document in a named frame
이미지에 링크를 걸 수 있습니다.
<a href="default.asp">
<img src="smiley.gif" alt="HTML tutorial" style="width:42px; height:42px; border:0">
</a>
목차로 가는 링크를 만들 수 있습니다.
<p><a href="#C4">Jump to Chapter 4</a></p>
<h2 id="C4">Chapter 4</h2>
외부 페이지의 경우 전체 경로를 적어줍니다.
<a href="https://www.w3schools.com/html/default.asp">HTML tutorial</a>
내부 페이지의 경우 파일 경로를 적어줍니다.
<a href="/html/default.asp">HTML tutorial</a>
같은 폴더의 경우 파일 이름만 적습니다.
<a href="default.asp">HTML tutorial</a>
링크의 밑줄을 없애려면 아래와 같이 적습니다.
<a href="html_images.asp" target="_blank" style="text-decoration:none;"> HTML Images</a>
이미지를 사용할 시 문법은 아래와 같습니다.
<img src=“url”>
이미지의 크기는 width와 height로 조절합니다.
<img src="img_girl.jpg" alt="Girl in a jacket" style="width:500px; height:600px;">
이미지는 다른 웹페이지에 있는 것도 불러올 수 있습니다.
<img src="https://www.w3schools.com/images/w3schools_green.jpg" alt="W3Schools.com" style="width:104px; height:142px;">
움직이는 이미지인 .gif 확장자도 사용 가능합니다.
<img src="programming.gif" alt="Computer man" style="width:48px;height:48px;">
문단에서 그림과 글자의 위치를 정할 수 있습니다.
<p>
<img src="smiley.gif" alt="Smiley face" style="float:right; width:42px; height:42px;">
A paragraph with a floating image. A paragraph with a floating image. A paragraph with a floating image.
</p>
그림 안에서 부분마다 링크를 걸 수 있습니다.
<map name="workmap">
<area shape="rect"(모양) coords="30(x축 위치), 44(y 축 위치), 100(가로 길이), 350(세로 길이)" alt="Computer" href="computer.htm">
<area shape="circle" coords="337(원 중심 x축), 300(원 중심 y 축), 45(반지름 길이)" alt="Cup of coffee" href="coffee.htm">
</map>
배경 그림을 넣는 법입니다.
<body style="background-image:url('clouds.jpg')">
글 영역에 그림을 넣는 법입니다.
<p style="background-image:url('clouds.jpg')">
웹페이지 크기에 따라 그림을 변경하는 방법입니다.
<picture>
<source media="(min-width: 650px)" srcset="img_pink_flowers.jpg">
<source media="(min-width: 465px)" srcset="img_white_flower.jpg">
<img src="img_orange_flowers.jpg" alt="Flowers" style="width:auto;">
</picture>
표 만들기입니다.
표의 첫 부분은 th로 정의합니다. 기본적으로 굵게와 가운데 정렬이 적용됩니다.
표의 값 부분은 td로 정의합니다.
각 행은 tr로 정의합니다.
표의 경계선은 다음과 같이 나타냅니다.
<style>
table, th, td
{
border: 1px solid black;
}
</style>
경계선 중복을 없애려면 다음과 같이 나타냅니다.
table, th, td
{
border: 1px solid black;
border-collapse: collapse;
}
</style>
한 칸의 크기를 조절하려면 다음과 같이 나타냅니다.
th, td
{
padding: 5px;
}
정렬을 바꾸고 싶다면 다음과 같이 나타냅니다.
th
{
text-align: left;
}
테이블의 밖의 경계선에 공간을 주고 싶다면 아래와 같이 나타냅니다.
table
{
border-spacing: 15px;
}
셀 행병합을 하고 싶다면 아래와 같이 나타냅니다.
<tr>
<th>Name</th>
<th colspan="2">Telephone</th>
</tr>
셀 열병합을 하고 싶다면 아래와 같이 나타냅니다.
tr>
<th rowspan="2">Telephone:</th>
<td>55577854</td>
</tr>
표의 제목을 넣고 싶으면 <caption>태그를 사용합니다.
<caption>Monthly savings</caption>
특정한 표에만 스타일을 지정하려면 #을 사용합니다.
table#t01
{
width: 100%;
background-color: #f1f1c1;
}
table#t01 tr:nth-child(even)
{
background-color: #eee;
}
table#t01 tr:nth-child(odd)
{
background-color:#fff;
}
table#t01 th
{
background-color: black;
color: white;
}
<table id="t01">
<li> 태그는 리스트를 나타냅니다. 보통 <ol>이나 <ul>의 자식 태그로 많이 사용됩니다.
말머리 기호를 만들고 싶을 때에는 <ul>태그를 사용합니다.
<ul>
<li>Coffee</li>
<li>Tea</li>
<li>Milk</li>
</ul>
말머리 기호 종류는 다음과 같습니다.
<ul style="list-style-type:circle"> ○
<ul style="list-style-type:disc"> ●
<ul style="list-style-type:square"> ■
<ul style="list-style-type:none"> 들여 쓰기.
순번 기호를 만들고 싶을 때에는 <ol>태그를 사용합니다.
순번 기호 종류는 다음과 같습니다.
<ol type="1">
<ol type="A">
<ol type="a">
<ol type="I"> 로마숫자
<ol type="i"> 로마숫자
들여 쓰기를 지원하는 기능으로는 <dl>태그가 있습니다.
<dl>
<dt>Coffee</dt>
<dd>- black hot drink</dd>
<dt>Milk</dt>
<dd>- white cold drink</dd>
</dl>
다중 말머리 기호도 가능합니다.
<ul>
<li>Coffee</li>
<li>Tea
<ul>
<li>Black tea</li>
<li>Green tea</li>
</ul>
</li>
<li>Milk</li>
</ul>
메뉴와 같은 수평 리스트 기능은 float를 사용합니다.
li
{
float: left;
}
새로운 줄에 작성되도록 하고 싶다면 <div>태그를 씁니다.
<div>Hello</div>
<div>World</div>
특정 영역만 스타일 사용이 가능합니다.
<div style="background-color:black; color:white; padding:20px;">
같은 줄에 작성되도록 하고 싶다면 <span>태그를 씁니다.
<span>Hello</span>
<span>World</span>
<h1>My <span style="color:red">Important</span> Heading</h1>
클래스는 CSS와 JavaScript가 특정한 곳에 반복되도록 도와주는 역할을 합니다.
<style>
.city
{
background-color: tomato;
color: white;
padding: 10px;
}
</style>
<h2 class="city">London</h2>
스크립트에선 응용해서 사용할 수 있습니다.
<head>
<script>
function myFunction()
{
var x = document.getElementsByClassName("city");
for (var i = 0; i < x.length; i++)
{
x[i].style.display = "none";
}
}
</script>
</head>
클래스 두 개를 혼합해서 사용할 수 있습니다.
<style>
.city
{
background-color: tomato;
color: white;
padding: 10px;
}
.main
{
text-align: center;
}
</style>
<h2 class="city main">London</h2>
다른 태그더라도 같은 스타일로 편집할 수 있습니다.
<h2 class="city">Paris</h2>
<p class="city">Paris is the capital of France.</p>
웹페이지 안에 웹페이지를 보여주려면 <iframe>태그를 씁니다.
<iframe>문법은 다음과 같습니다.
<iframe src=“URL”></iframe>
<iframe>길이를 조절할 수 있습니다.
<iframe src="demo_iframe.htm" height="200" width="300"></iframe>
<iframe>경계선을 제거하거나 편집할 수 있습니다.
<iframe src="demo_iframe.htm" style="border:none;"></iframe>
<iframe src="demo_iframe.htm" style="border:2px solid grey;"></iframe>
링크와 <iframe>을 혼합 활용할 수 있습니다.
<iframe height="300px" width="100%" src="demo_iframe.htm“
name="iframe_a"></iframe>
<p><a href="https://www.w3schools.com" target="iframe_a">W3Schools.com</a></p>
스크립트를 사용하기 위해서는 <script>를 사용합니다. client-side script를 정의합니다.
스크립트에서는 getElementById(id)를 많이 사용합니다.
<p id="demo"></p>
<script>
document.getElementById("demo").innerHTML = "Hello JavaScript!";
</script>
자바스크립트를 활용하여 버튼을 누르면 글자가 변경되도록 할 수 있습니다.
<button type="button" onclick="myFunction()">Click Me!</button>
<p id="demo">This is a demonstration.</p>
<script>
function myFunction()
{
document.getElementById("demo").innerHTML = "Hello JavaScript!";
}
</script>
또한, 글자 서식도 변경할 수 있습니다.
<p id="demo">JavaScript can change the style of an HTML element.</p>
<script>
function myFunction()
{
document.getElementById("demo").style.fontSize = "25px";
document.getElementById("demo").style.color = "red";
document.getElementById("demo").style.backgroundColor = "yellow";
}
</script>
<button type="button" onclick="myFunction()">Click Me!</button>
그리고, 버튼을 눌러서 이미지를 변경할 수 있습니다.
<script>
function light(sw)
{
var pic;
if (sw == 0)
{
pic = "pic_bulboff.gif"
}
else
{
pic = "pic_bulbon.gif"
}
document.getElementById('myImage').src = pic;
}
</script>
<img id="myImage" src="pic_bulboff.gif" width="100" height="180">
<p>
<button type="button" onclick="light(1)">Light On</button>
<button type="button" onclick="light(0)">Light Off</button>
</p>
스크립트가 지원되지 않는 사용자를 위한 코멘트를 <noscript>태그에 적습니다.
<noscript>Sorry, your browser does not support JavaScript!</noscript>
스크립트 태그 안에서는 //로 주석이 가능합니다.
HTML 파일 경로에 대해서 알아보겠습니다.
(리눅스를 접해본 사람은 금방 알아차릴 수 있습니다.)
<img src="picture.jpg">
picture.jpg is located in the same folder as the current page
<img src="images/picture.jpg">
picture.jpg is located in the images folder in the current folder
<img src="/images/picture.jpg">
picture.jpg is located in the images folder at the root of the current web
<img src="../picture.jpg">
picture.jpg is located in the folder one level up from the current folder
<head>태그 안에 사용되는 태그들에 대해서 알아보겠습니다.
<title>태그는 인터넷 탭에 표시되는 이름을 나타냅니다.
<title>Page Title</title>
<style>태그는 서식에 관련된 내용을 포함합니다.
<style>
body {background-color: powderblue;}
h1 {color: red;}
p {color: blue;}
</style>
<link>태그는 외부에 있는 .css파일을 참조할 때 사용합니다.
<head>
<title>Page Title</title>
<link rel="stylesheet" href="mystyle.css">
</head>
<meta>태그는 브라우저에서 어떻게 표현할 것인가를 설정합니다.
언어 설정
<meta charset="UTF-8">
웹페이지 설명
<meta name="description" content="Free Web tutorials">
검색 엔진을 위한 키워드 설정
<meta name="keywords" content="HTML, CSS, XML, JavaScript">
저자 이름
<meta name="author" content="John Doe">
30초마다 새로 고침
<meta http-equiv="refresh" content="30">
기기에 맞춰서 화면 조절
<meta name="viewport" content="width=device-width, initial-scale=1.0">
자바스크립트 사용
<script>
function myFunction
{
document.getElementById("demo").innerHTML = "Hello JavaScript!";
}
</script>
기본 url 설정 및 기본 target 설정
<base href="https://www.w3schools.com/images/" target="_blank">
HTML5 표준에 따르면, <html>, <body>, <head>태그는 생략이 가능합니다.
하지만 추천하지는 않습니다.
HTML 기본 Layout입니다.
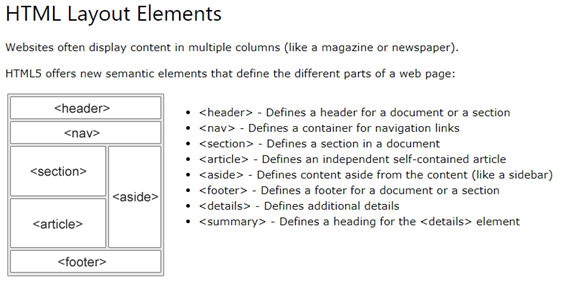
레이아웃을 만드는 여러 가지 방법이 있습니다.
- HTML tables
추천하지 않습니다.
- CSS Frameworks
빠르게 만들고 싶다면, W3.CSS 또는 Bootstrap을 사용하면 됩니다.
- CSS Floats
일반적입니다. 단점으로는 유연하지 못합니다.
- CSS Flexbox
유연합니다. 단점으로는 IE10이나 이전 버전에서 작동하지 않습니다.
반응형 웹에 대해서 알아보겠습니다.
반응형 웹은 어느 디바이스에서나 보기 편하게 최적화됩니다.
반응형 웹을 만들기 위해서는 먼저 viewport를 사용합니다.
<meta name="viewport" content="width=device-width, initial-scale=1.0">
그리고 그림의 경우 아래와 같이 설정합니다.
<img src="img_girl.jpg" style="width:100%;">
그러나 이렇게 하게 되면, 원본보다 그림이 커질 때가 있어, max-width 방법을 사용합니다.
<img src="img_girl.jpg" style="max-width:100%;height:auto;">
만약 크기에 따라 다른 이미지를 보이고 싶다면 아래와 같이 설정합니다.
<picture>
<source srcset="img_smallflower.jpg" media="(max-width: 600px)">
<source srcset="img_flowers.jpg" media="(max-width: 1500px)">
<source srcset="flowers.jpg">
<img src="img_smallflower.jpg" alt="Flowers">
</picture>
크기에 따라 글자 크기를 변경하고 싶다면 아래와 같이 설정합니다.
<h1 style="font-size:10vw;">Hello World</h1>
게다가, 크기에 따라 메뉴를 옆으로 하거나, 쌓으려면 Media Queries를 사용합니다.
@media (max-width:800px)
{
.left, .main, .right
{
width:100%; /*The width is 100%, when the viewport is 800px or smaller*/
}
}
무료 프레임 워크를 사용하는 것도 좋은 방법 중 하나입니다.
HTML Computer Code에 대해서 알아보겠습니다.
<kdb>태그는 키보드 입력을 나타내는 태그입니다.
기본인 모노스페이스 글자체가 쓰입니다.
<p>Save the document by pressing <kbd>Ctrl + S</kbd></p>
<samp>태그는 출력을 나타내는 태그입니다.
기본인 모노스페이스 글자체가 쓰입니다.
<p>If you input wrong value, the program will return <samp>Error!</samp></p>
<code>태그는 컴퓨터 코드를 나타내는 태그입니다.
기본인 모노스페이스 글자체가 쓰입니다.
<code>
x = 5;
y = 6;
z = x + y;
</code>
적은 대로 출력하고 싶다면 아래와 같이 사용합니다.
<pre>
<code>
x = 5;
y = 6;
z = x + y;
</code>
</pre>
<var>태그는 변수를 나타내거나, 수학식을 나타낼 때 사용합니다.
Einstein wrote: <var>E</var> = <var>mc</var><sup>2</sup>
HTML Entities에 대해서 알아보겠습니다.
비교 ‘<’의 경우 태그의 ‘<>’와 혼동되므로 대체하는 문자를 사용합니다. <를 사용하거나, <를 사용합니다.
글자를 합성하려면 아래와 같이 합니다.
̀+a = à -> à
심벌을 사용하려면 아래와 같이 합니다.
€ € € EURO SIGN
글자를 지정해 주어야 제대로 보입니다.
UTF-8 (Unicode) covers almost all of the characters and symbols in the world.
<meta charset="UTF-8">
URL - Uniform Resource Locator에 대해서 알아보겠습니다.
URL은 web 주소를 위한 다른 언어입니다.
기본 형식은 scheme://prefix.domain:port/path/filename입니다.
URL은 URL 인코딩을 사용합니다. 아스키코드표에 없는 것은 % 가 붙습니다.
XHTML은 HTML 환경을 좋게 만들기 위해서 사용합니다.
태그를 닫지 않는 등의 잘못된 코딩을 용납하지 않습니다.
입력 박스에 대해서 알아보겠습니다.
<form>태그는 사용자의 입력을 받는 태그입니다.
<input>태그는 <form>태그에서 가장 중요한 태그입니다.
<input>태그 종류로는 3가지가 있습니다.
<input type="text"> Defines a one-line text input field
<input type="radio"> Defines a radio button (for selecting one of many choices)
<input type="submit"> Defines a submit button (for submitting the form)
text 사용 방법입니다. 20자가 기본 최댓값입니다.
<form>
First name:<br>
<input type="text" name="firstname">
<br>
Last name:<br>
<input type="text" name="lastname">
</form>
라디오 버튼 사용법입니다.
<form>
<input type="radio" name="gender" value="male" checked> Male<br>
<input type="radio" name="gender" value="female"> Female<br>
<input type="radio" name="gender" value="other"> Other
</form>
submit 버튼 사용법입니다.
<form action="/action_page.php">
First name:<br>
<input type="text" name="firstname" value="Mickey">
<br>
Last name:<br>
<input type="text" name="lastname" value="Mouse">
<br><br>
<input type="submit" value="Submit">
</form>
action 속성입니다. submit을 눌렀을 때의 동작을 나타냅니다.
<form action="/action_page.php">
target 속성입니다. submit을 눌렀을 때의 동작을 나타냅니다.
<form action="/action_page.php" target="_blank">
method 속성입니다. GET 인지 POST 인지 설정할 수 있습니다.
<form action="/action_page.php" target="_blank" method="GET">
<form action="/action_page.php" target="_blank" method="POST">
name 속성입니다. name 속성을 사용하지 않을 시, 데이터가 전송되지 않습니다.
<input type="text" name="lastname" value="Mouse"><br><br>
fieldset과 legend 속성입니다. fieldset은 경계선을 그어주고, legend는 제목을 달아줍니다.
<fieldset>
<legend>Personal information:</legend>
</fieldset>
<input> 태그에 대해서 자세히 알아보겠습니다.
type이 중요합니다. type이 생략될 시 기본으로 text입니다.
<input name="firstname" type="text">
<select> 태그의 경우 드롭-다운 리스트입니다.
<select name="cars">
<option value="volvo">Volvo</option>
<option value="saab">Saab</option>
<option value="fiat">Fiat</option>
<option value="audi">Audi</option>
</select>
selected 속성은 기본 선택 값을 나타냅니다. <select>의 경우 기본 값은 맨 위의 글자입니다.
<option value="fiat" selected>Fiat</option>
size 속성은 처음 보여주는 줄의 개수를 설정합니다.
<select name="cars" size="3">
multiple 속성은 다중 선택이 가능하도록 만들어 줍니다.
<select name="cars" size="4" multiple>
<textarea> 태그는 글자를 입력하는 큰 상자를 만들어 줍니다.
<textarea name="message" rows="10" cols="30">The cat was playing in the garden.</textarea>
CSS를 사용하여 크기를 조절할 수 있습니다.
<textarea name="message" style="width:200px; height:600px;">The cat was playing in the garden.</textarea>
<button> 태그는 버튼을 만듭니다.
<button type="button" onclick="alert('Hello World!')">Click Me!</button>
<datalist> 태그는 HTML5에 추가된 기능으로 드롭-다운 기능과 텍스트 기능을 동시에 지원합니다.
<input list="browsers" name="browser">
<datalist id="browsers">
</datalist>
<output> 태그는 결과를 바로 보여줍니다. HTML5에 추가된 기능입니다.
<form action="/action_page.php"
oninput="x.value=parseInt(a.value)+parseInt(b.value)">
0
<input type="range" id="a" name="a" value="50">
100 +
<input type="number" id="b" name="b" value="50">
=
<output name="x" for="a b"></output>
<br><br>
<input type="submit">
</form>
<input>태그에 대해서 좀 더 알아보겠습니다.
<input type="text">는 한 줄 입력 상자입니다.
password type은 암호를 *로 나타냅니다.
User password:<br>
<input type="password" name="psw">
submit은 데이터를 서버로 넘겨줍니다.
<input type="submit">
reset은 기본값으로 초기화합니다.
<input type="reset">
radio는 라디오 버튼을 만듭니다.
<input type="radio">
checkbox는 선택 박스를 만듭니다. 0개 ~ 모두
<input type="checkbox">
button은 버튼을 만듭니다.
<input type="button">
<input type="button" onclick="alert('Hello World')" value="Click Me">
color는 색깔을 선택할 수 있습니다.
<input type="color" name="favcolor">
date는 날짜를 선택할 수 있습니다.
<input type="date" name="bday">
최대, 최소를 설정할 수 있습니다.
Enter a date before 1980-01-01:<br>
<input type="date" name="bday" max="1979-12-31"><br><br>
Enter a date after 2000-01-01:<br>
<input type="date" name="bday" min="2000-01-02"><br><br>
datetime-local은 날짜와 시간을 선택할 수 있습니다.
<input type="datetime-local" name="bdaytime">
email은 이메일 형식을 사용하도록 합니다.
<input type="email" name="email">
month는 연도와 달을 선택할 수 있습니다.
<input type="month" name="bdaymonth">
number는 숫자를 입력받습니다. 최대, 최소 설정 가능합니다.
<input type="number" name="quantity" min="1" max="5">
최대, 최소, 이동 범위, 기본 값을 나타냅니다.
<input type="number" name="quantity"
min="0" max="100" step="10" value="30">
range는 막대 바를 이용하여 숫자를 선택합니다. 기본은 0에서 100입니다.
<input type="range" name="points" min="0" max="10">
search는 text type과 동일하게 작동합니다.
<input type="search" name="googlesearch">
tel은 전화번호를 받습니다. safari8만 작동합니다.
<input type="tel" name="usrtel">
time은 시간을 선택합니다.
<input type="time" name="usr_time">
url은 url을 입력받습니다.
<input type="url" name="homepage">
week는 주간을 입력받습니다.
<input type="week" name="year_week">
value 속성은 초깃값을 나타냅니다.
<input type="text" name="firstname" value="John">
readonly는 수정이 불가능합니다.
<input type="text" name="firstname" value ="John" readonly>
disabled는 회색 처리가 되고, 서버로 전달이 되지 않습니다.
<input type="text" name="firstname" value="John" disabled>
size는 입력 상자의 길이를 조절합니다.
<input type="text" name="firstname" value="John" size="40">
maxlength는 최대 글자 수를 규정합니다.
<input type="text" name="firstname" maxlength="10">
autocomplete는 입력한 기록을 남깁니다. (자동완성)
<form action="/action_page.php" autocomplete="on">
First name:<input type="text" name="fname"><br>
Last name: <input type="text" name="lname"><br>
E-mail: <input type="email" name="email" autocomplete="off"><br>
<input type="submit">
</form>
novalidate는 입력 형식을 확인하지 않습니다. 이메일 경우 @ 없이 가능.
<form action="/action_page.php" novalidate>
E-mail: <input type="email" name="user_email">
<input type="submit">
autofocus는 페이지가 처음 로드될 때, 바로 입력 가능하게 합니다.
First name:<input type="text" name="fname" autofocus><br>
form 속성은 form 밖에 있어도 같은 form으로 인식되게 합니다.
<form action="/action_page.php" id="form1">
First name: <input type="text" name="fname"><br>
<input type="submit" value="Submit">
</form>
Last name: <input type="text" name="lname" form="form1">
formaction 속성은 다른 php로 전송하는 기능을 합니다.
formaction="/action_page2.php" value="Submit to another page">
formenctype 속성은 다른 인코딩 방식으로 전송할 수 있습니다. POST 방식만 가능합니다.
submit과 image만 가능합니다.
<input type="submit" formenctype="multipart/form-data"
value="Submit as Multipart/form-data">
formmethod 속성은 전송 방식을 변경할 수 있습니다.
submit과 image만 가능합니다.
<form action="/action_page.php" method="get">
First name: <input type="text" name="fname"><br>
Last name: <input type="text" name="lname"><br>
<input type="submit" value="Submit">
<input type="submit" formmethod="post" value="Submit using POST">
formnovalidate 속성은 형식을 무시합니다. 이메일 @.
submit만 가능합니다.
<input type="submit" formnovalidate value="Submit without validation">
formtarget 속성은 target을 변경합니다.
<input type="submit" value="Submit as normal">
<input type="submit" formtarget="_blank" value="Submit to a new window/tab">
width, height 속성은 크기를 설정합니다.
<input type="image" src="img_submit.gif" alt="Submit" width="48" height="48">
input type=“image”는 마우스의 x, y 좌표도 같이 보냅니다.
input list 속성은 미리 완성된 내용 목록을 보여줍니다.
<input list="browsers" name="browser">
<datalist id="browsers">
<option value="Internet Explorer">
<option value="Firefox">
<option value="Chrome">
<option value="Opera">
<option value="Safari">
</datalist>
<input type="submit">
min, max 속성은 최솟값과 최댓값을 정합니다.
Enter a date before 1980-01-01:
<input type="date" name="bday" max="1979-12-31"><br>
Enter a date after 2000-01-01:
<input type="date" name="bday" min="2000-01-02"><br>
Quantity (between 1 and 5):
<input type="number" name="quantity" min="1" max="5"><br>
<input type="submit">
multiple 속성은 여러 개의 선택을 가능하게 합니다.
Select images: <input type="file" name="img" multiple>
<input type="submit">
pattern 속성은 정규 표현식이 사용 가능하며, 형식을 지정합니다.
Country code: <input type="text" name="country_code" pattern="[A-Za-z]{3}" title="Three letter country code">
placeholder 속성은 빈칸에 힌트를 보여줍니다.
<input type="text" name="fname" placeholder="First name"><br>
<input type="text" name="lname" placeholder="Last name"><br>
<input type="submit" value="Submit">
required 속성은 반드시 채워야 제출이 됩니다.
Username: <input type="text" name="usrname" required>
step 속성은 유효한 값의 간격을 나타냅니다. 3의 배수로 입력 가능.
<input type="number" name="points" step="3">
SQL과 PHP를 공부하여 웹서버를 만들어 보겠습니다.
끝.
카테고리: HTML


.png)


댓글
댓글 쓰기
궁금한 점은 댓글 달아주세요.
Comment if you have any questions.