
KiCad 시작하기 6 (FreeRoute 사용하기 1)
사용 버전: KiCad 5.1.4
먼저, Freeroute 기능을 사용하려면, Java JDK를 설치해야 합니다.
Freeroute 기능은 Java 파일이기 때문입니다.
저는 NetBeans IDE를 사용하겠습니다.
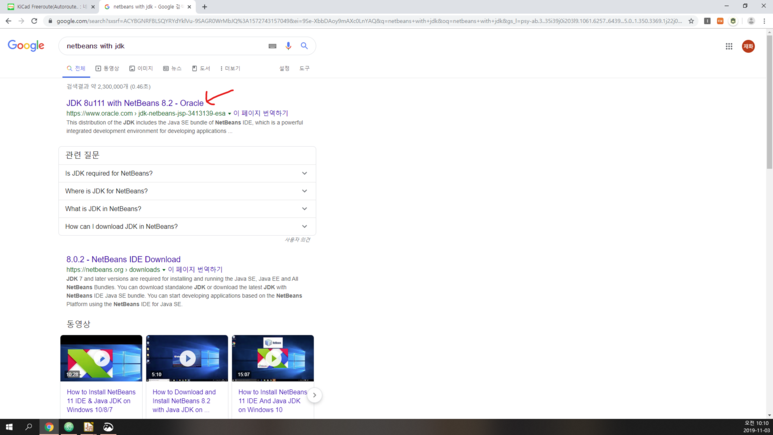
License 수락을 하고, 운영체제에 맞는 실행파일을 내려받습니다.

받은 파일을 실행합니다.


다음으로 Freeroute 코드를 내려받습니다.
https://github.com/nikropht/FreeRouting

압축을 풀어서 적당한 위치에 둡니다.
(한글 경로는 피해주세요.)
자바 도움 파일인 jh.jar 파일을 아래 사이트에서 내려받습니다.
https://github.com/kellertuer/Gravel/blob/master/javahelp/jh2.0/javahelp/lib/jh.jar

내려받은 jh.jar 파일을 적당한 위치에 둡니다.(한글 경로는 피해주세요.)
이제, 설치된 NetBeans IDE 8.2를 실행합니다.

File-New Project를 누릅니다.

Java - Java Project with Existing Sources를 누르고 Next를 누릅니다.

이름을 변경해주고, 저장 위치를 원하는 곳으로 설정합니다.

Add Folder...를 누릅니다.

압축을 푼 FreeRouting-master를 찾아 열기를 누릅니다.

추가된 것을 확인하고, Next를 누릅니다.

Finish를 누릅니다.

프로젝트를 우 클릭하여, Properties를 누릅니다.

Libraries를 누르고, Add JAR/Folder를 누릅니다.

jh.jar 파일을 선택하고, 열기를 누릅니다.


다음으로 Application - Web Start를 눌러 Enable Web Start를 선택합니다.

Run Project 버튼을 눌러봅시다.


위와 같은 창이 나타나면, Freeroute를 사용할 준비가 다 되었습니다.
지금까지 Freeroute를 사용하기 위한 NetBeans, FreeRouting-master, jh.jar를 내려받아 환경 구축을 해보았습니다.
다음에는 Freeroute를 이용한 자동 전선 긋기를 해보겠습니다.
끝.
오늘은 KiCad의 숨겨진(?) 기능, 지금은 비활성화가 된 기능 Freeroute 또는 Autoroute를 해보겠습니다.
먼저, Freeroute 기능을 사용하려면, Java JDK를 설치해야 합니다.
Freeroute 기능은 Java 파일이기 때문입니다.
저는 NetBeans IDE를 사용하겠습니다.
License 수락을 하고, 운영체제에 맞는 실행파일을 내려받습니다.
받은 파일을 실행합니다.
다음으로 Freeroute 코드를 내려받습니다.
https://github.com/nikropht/FreeRouting
압축을 풀어서 적당한 위치에 둡니다.
(한글 경로는 피해주세요.)
자바 도움 파일인 jh.jar 파일을 아래 사이트에서 내려받습니다.
https://github.com/kellertuer/Gravel/blob/master/javahelp/jh2.0/javahelp/lib/jh.jar
내려받은 jh.jar 파일을 적당한 위치에 둡니다.(한글 경로는 피해주세요.)
이제, 설치된 NetBeans IDE 8.2를 실행합니다.
File-New Project를 누릅니다.
Java - Java Project with Existing Sources를 누르고 Next를 누릅니다.
이름을 변경해주고, 저장 위치를 원하는 곳으로 설정합니다.
Add Folder...를 누릅니다.
압축을 푼 FreeRouting-master를 찾아 열기를 누릅니다.
추가된 것을 확인하고, Next를 누릅니다.
Finish를 누릅니다.
프로젝트를 우 클릭하여, Properties를 누릅니다.
Libraries를 누르고, Add JAR/Folder를 누릅니다.
jh.jar 파일을 선택하고, 열기를 누릅니다.
다음으로 Application - Web Start를 눌러 Enable Web Start를 선택합니다.
Run Project 버튼을 눌러봅시다.
위와 같은 창이 나타나면, Freeroute를 사용할 준비가 다 되었습니다.
지금까지 Freeroute를 사용하기 위한 NetBeans, FreeRouting-master, jh.jar를 내려받아 환경 구축을 해보았습니다.
다음에는 Freeroute를 이용한 자동 전선 긋기를 해보겠습니다.
끝.
카테고리: BlackSmith, KiCad

[계수기] 앱 광고
외국: Hand Counter
계수기 앱.
하나씩 개수를 셀 때 사용해보세요.
센 숫자를 메모와 함께 저장할 수 있습니다.
감사합니다.
[계수기] 앱 광고 끝.


.png)


감사합니다.
답글삭제